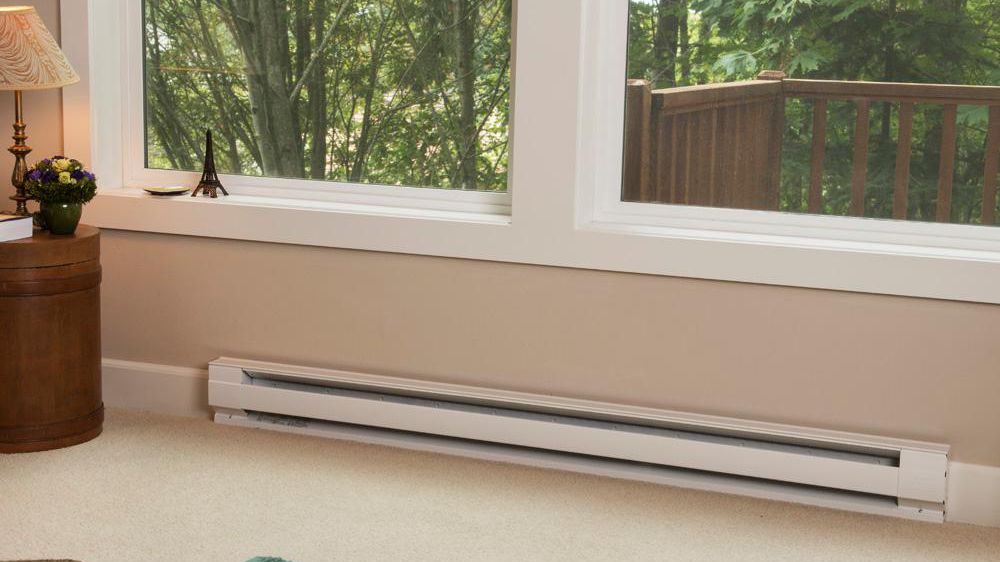
Baseboard heaters are standard in old and small homes since they are inexpensive and straightforward to install. They are typically used as a secondary heating source in bigger living rooms as they can heat up quickly.
The installation of baseboard heaters does not require you to redo the entire floor for heating panels or tear up walls for the ventilation system. Despite their low cost-efficiency compared to alternative heating systems, they are quite popular due to their ease of installation.
They are as simple to install as they are to remove. The removal procedure is simple, and anyone with basic electrical and plumbing expertise can accomplish it with ease. This step-by-step guide will walk you through the process of removing your baseboard heaters securely.
The important part is that there are two types of baseboard heaters installed in most homes. First, we will briefly get familiar with both types. After that, you can follow the instructions for the baseboard heater type you want to remove.
Types of Baseboard Heaters
There are two types of baseboard heaters on the market, and the first step is to determine which one you have installed.
-
Hydronic Baseboard Heaters
Hydronic baseboard heaters do not have a direct electrical connection. Instead, they transmit water through copper or steel pipes, heating metal fins inside the heater in the process.
An electric-heated boiler supplies an internal reservoir of warm liquid. In essence, it’s still an electrically powered heating system with an extra stage of energy transfer.
-
Electric Baseboard Heaters
Electric baseboard heaters are convection heaters that are hooked up to the electrical system of the house. Heating panels with metal fins are heated by electricity, so the heaters circulate air around the room. Since they do not require pipe installation or boilers, these baseboard heaters are more common and less expensive.
Elements of Baseboard Heaters
For an easier understanding of the actual removal process, let’s get familiar with essential baseboard elements, their names, and positions. Electric and hydronic baseboard heaters have a main metal cabinet, which is held up on the wall with the help of screws. At the same time, the front panel’s role is to protect the inner aluminum ribbon fins.
The electric baseboard heater also has a separate section on either end of the heater where the house circuit wires and heater wires connect. A tiny screw secures this portion at the bottom of the heater. Furthermore, copper or steel pipes connect hydronic baseboard heaters to and from the heater. They contain a heated liquid, in this case, water, which is used to heat ribbon fins.
Step-by-Step Guide
The steps below follow the exact order of the baseboard removal process. Before starting, check out all the steps and then the section that describes the required tools. Make sure you have everything you need to finish baseboard heater removal successfully.
-
Shut Down Electrical Power
Before starting any actual work, make sure the power is off. On the main house panel, switch off the main breaker to cut electricity supply to all circuit branches in the house. This is the most critical step in terms of your safety, therefore double-check it. If you have hydronic baseboard heaters, you need to wait for them to cool down.
Wait until the pipes and boiler are completely cold after turning off the power. It may take a couple of hours for this process to complete; only then is it safe to continue and remove the baseboard heaters. If the heating was on before you turned off the main electrical switch, you might need to wait roughly 30 minutes with electric baseboard heaters. Then, after the metal fins inside the heater have cooled down, it is okay to proceed with the next step.
-
Take Off Protecting Panel
The front side of the baseboard heater has a protective plate that protects metal fins from damage and injuries. Because this panel is frequently not screwed in but instead adhered to the wall, it is simple to remove.
Now that you have a general understanding of the internal components of the baseboard heater, you can proceed to the more difficult steps of removing it.
-
Detach Wires/Cut the Pipes
At each end of the electric baseboard heater, wires are linked and housed in a separate portion. Disconnect the associated wires by unscrewing this portion. There are terminal screws on these cables that we need to remove to unplug the heater from the power source. After that, the wires will be exposed. To double-check if there is electricity voltage, use a voltmeter.
The hydronic baseboard heaters do not have a direct electrical connection. Therefore, the next step is to use a pipe saw or a pipe cutter to cut down supply and return pipes.
If you decide to use a pipe saw for the first time and have never used one before, this could be challenging because a pipe saw is difficult to use for an inexperienced plumber. A pipe cutter, which is much easier to handle and cut pipes, would be the best option. To avoid excessively high pipe ends, cut the pipes as close to the floor as possible.
-
Remove the Metal Cabinet
The heating panel with metal fins is now disconnected from the wiring and pipes. It’s now safe to remove the heating panel and approach the rest of the baseboard heater.
A metal cabinet will be mounted on the wall and secured with screws. To remove the screws and disconnect the cabinet from the wall, use a screwer. You may need extra strength or assistance to separate the metal base from the wall, depending on how strong and deep the screws are.
-
Secure Wires and Pipes
To disconnect the heating panel from the electrical source, we unscrewed the wire nut in step three. You must place wire caps on bare wires to safeguard a home from damage when the power is restored. Electrical circuits in a home will be safe in this manner.
Tape all of the wires together so they don’t tangle even more to secure the ends. There should be a junction box for storing wires. After you put wires in, make sure that the box is completely closed.
It may be that there is no junction box but only a hole in the wall from where the wires are coming out. In that case, put away taped wires in the hole and then use a drywall patch to close that hole.
We have cut out the pipes on the hydronic baseboard heaters and removed the baseboard heater main cabinet. The next step is to secure the pipe ends. You should secure the pipes because they can be easily damaged and are prone to dust. To protect them and stop the fluid flow from unused pipes, put pipe caps on every end.
Tools You May Need
To successfully finish the baseboard heater removal, you need all the tools that are mentioned above in the steps. Tools like screwdrivers or isolation tapes are standard in every home. On the other hand, wire and pipe caps are usually bought only when needed. To make your search easier and faster, we have compiled a list of required tools with brief usage directions.
Pipe Cutter
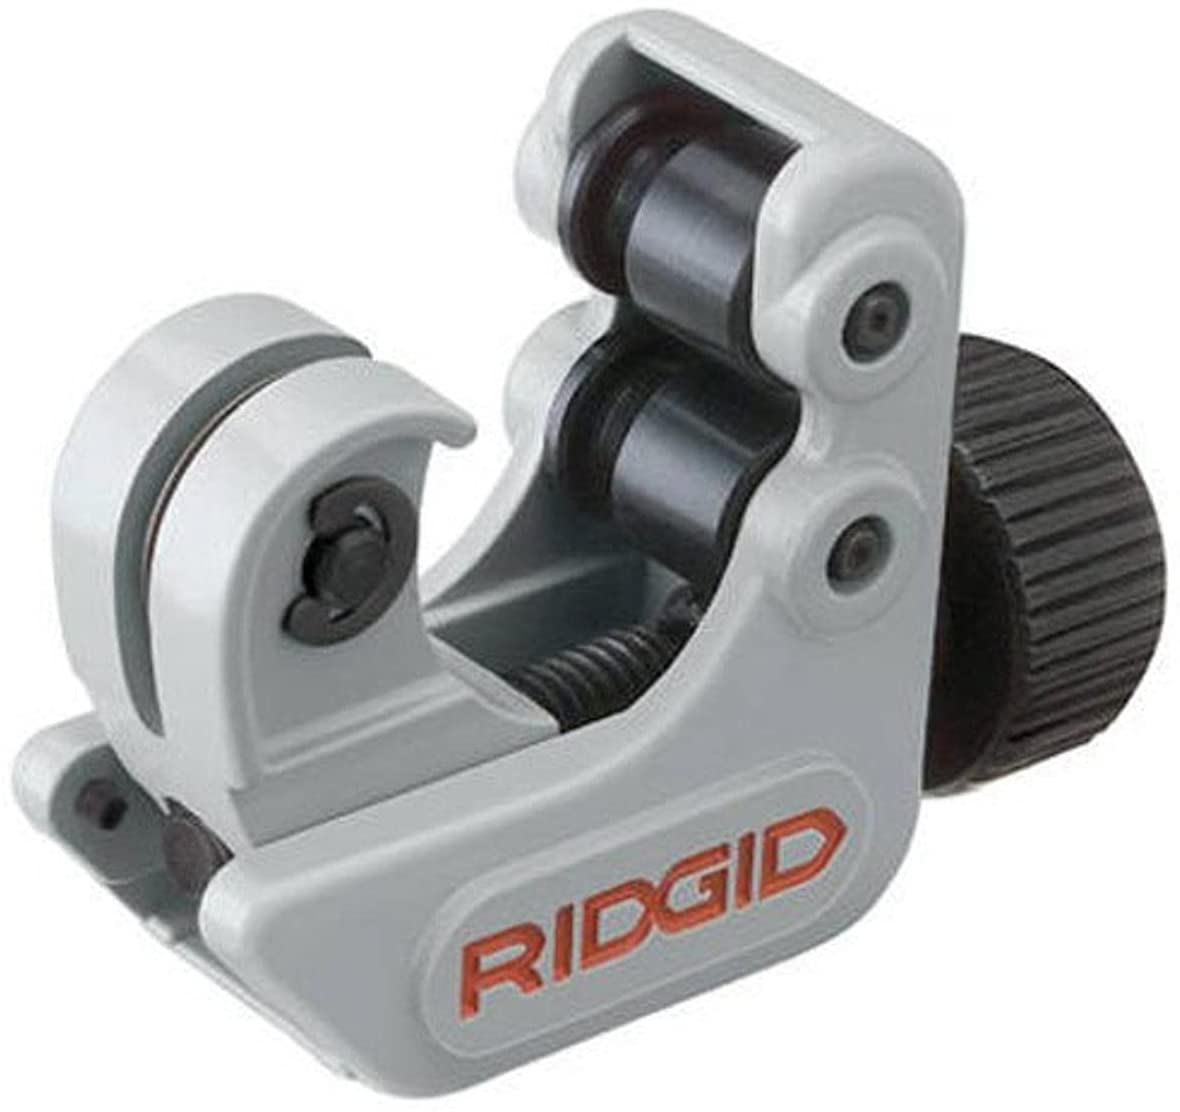
Specifications:
Applications: Cuts hard and soft copper, aluminum, brass, plastic tubing
Pipe Capacity: 1/4-inch to 1-1/8-inch (6 mm to 28 mm)
Weight: 1/2 pound (0.23 kg)
If your day job is not a plumber or something similar, it’s unlikely that you have a tool for cutting pipes in your home. It is possible to use a hacksaw for the pipes, but it is difficult to get a clean cut on pipes with the saw.
A pipe cutter is handy, small, and easy to handle. It gives a clean-cut, and it is much easier to handle for someone inexperienced.
Voltmeter
 Specifications:
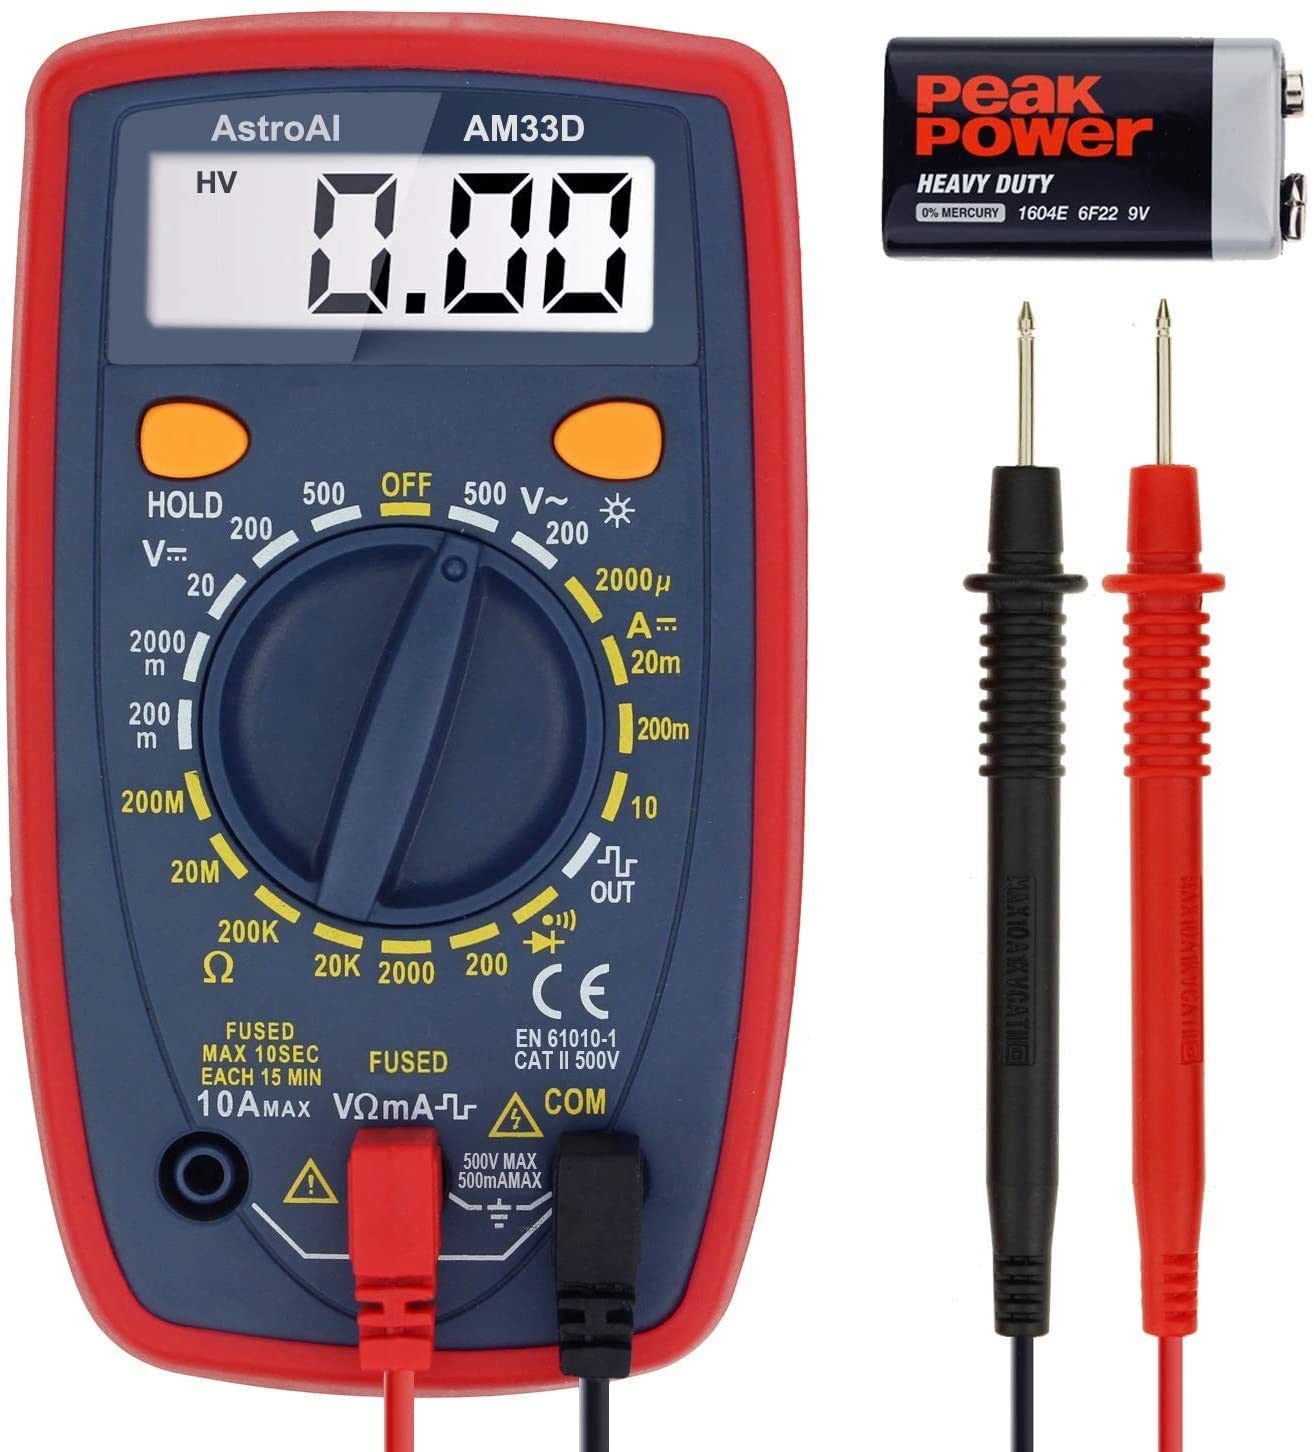
Brand: AstroAI
Color: Red
Product Dimensions: 5.1 x 2.8 x 1.4 inches; 6.35 Ounces
Measurement Type: Voltmeter, Multimeter
A voltmeter is a standard tool for the home toolbox. If you’ve never used one before, it’s as simple as leaning a voltmeter against a bare wire and looking for light signals. If it is on, it means that the wire still has electricity. Turn off all electrical power in the house and check again. For safety concerns, double-check each wire.
A voltage tester is an excellent alternative to a voltmeter. The main advantage of this tool is that it is non-contact. Meaning the wires do not have to be bare to check if the power is off. It is enough to lean the voltage tester against the jack, and it will send a signal for electricity if there is any.
Wire caps
Specifications:
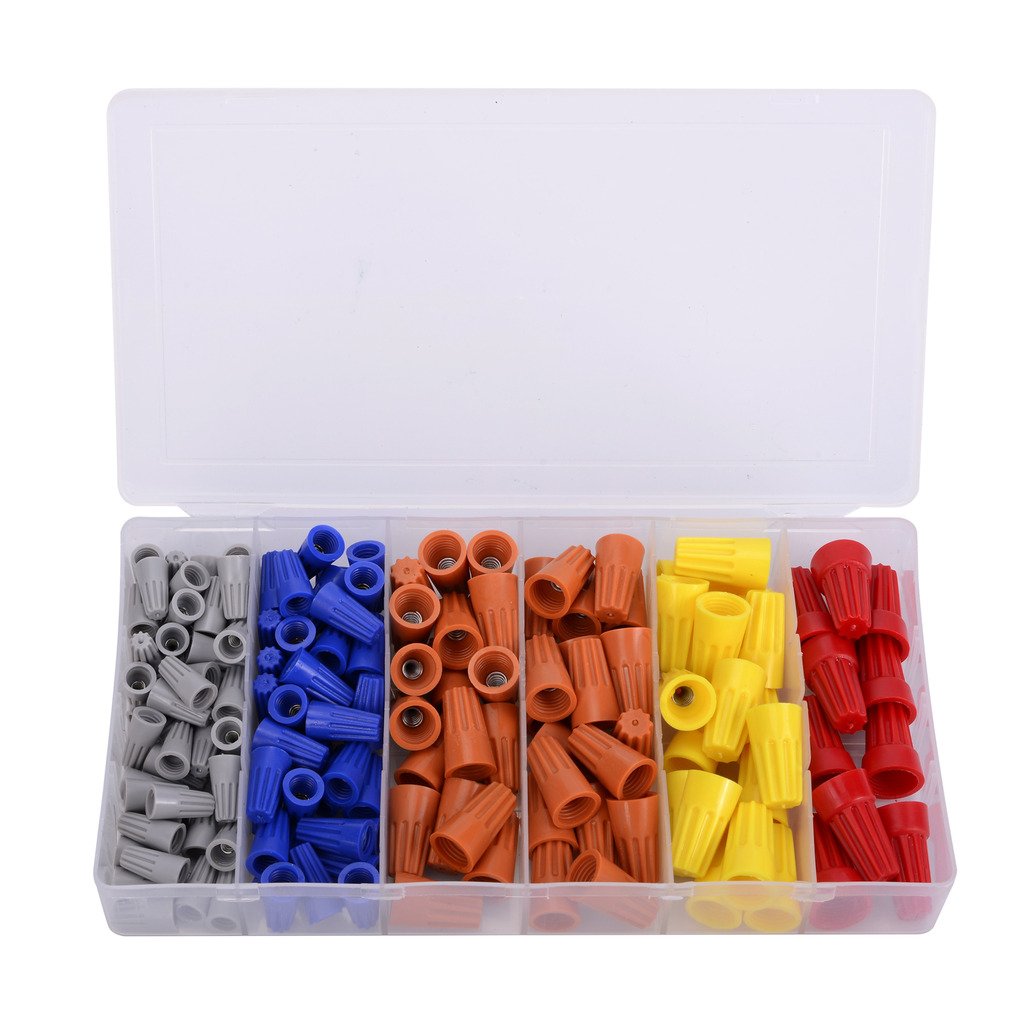
Brand Name: EFIXTK
Connector Type: Screw
Item Weight: 10.6 ounces
Model Number: MJE1027
With wire caps or wire connectors, we make the connection tighter by placing them on bare wires. In this particular case, wire caps will isolate every wire to store them safely.
Pipe caps
Specifications:

Size: 0.75 Inch
Material: Iron
Brand: Home TZH
Package Dimensions: 7.5 x 5.4 x 3.7 inches; 3.05 Pounds
After cutting supply pipes, a rough edge can be a safety hazard for households and cause later expansion because of damage. Pipe caps are simply screwed up tight on the pipe ends to seal and protect them.
Screwdriver
Specifications:
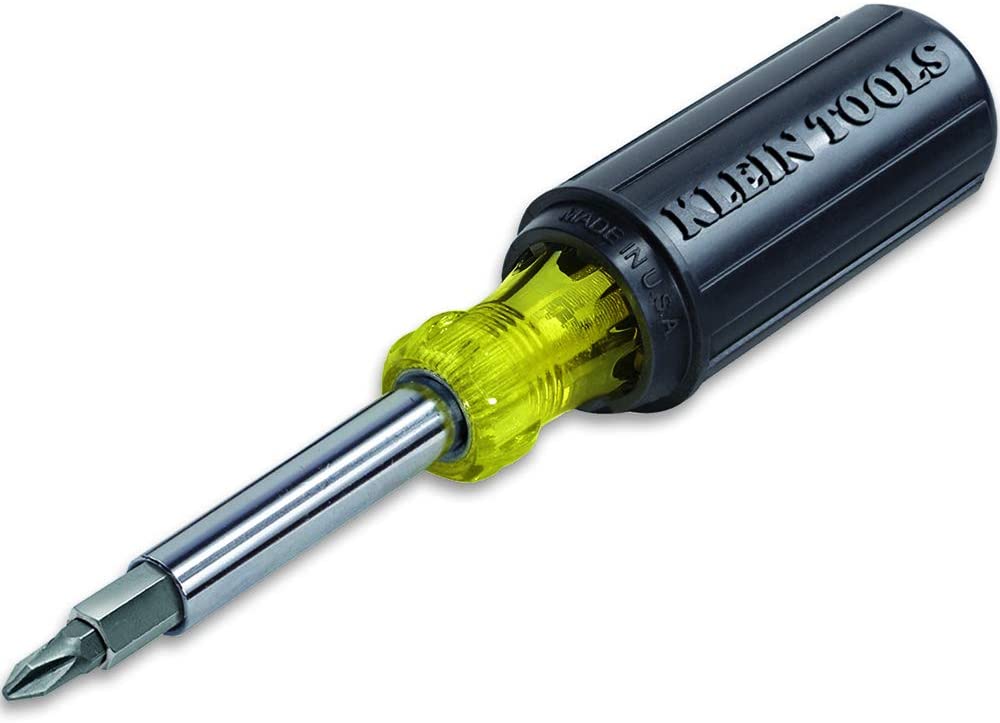
Model Name: 32500
Brand: Klein Tools
Material: Includes industrial strength heat treated bits: 3/8-Inch, 5/16-Inch and 1/4-Inch nut drivers, #1 and #2 Phillips, 1/4-Inch and 3/16-Inch slotted, T10 and T15 TORX, and #1 and #2 square recess
A screwdriver is an essential tool for every house. Everyone has at least one screwdriver in their home. If you need a new screwdriver or one that comes with multiple ads-on for different screw sizes, it is included in our tool list.
Insulation Tape
Specifications:
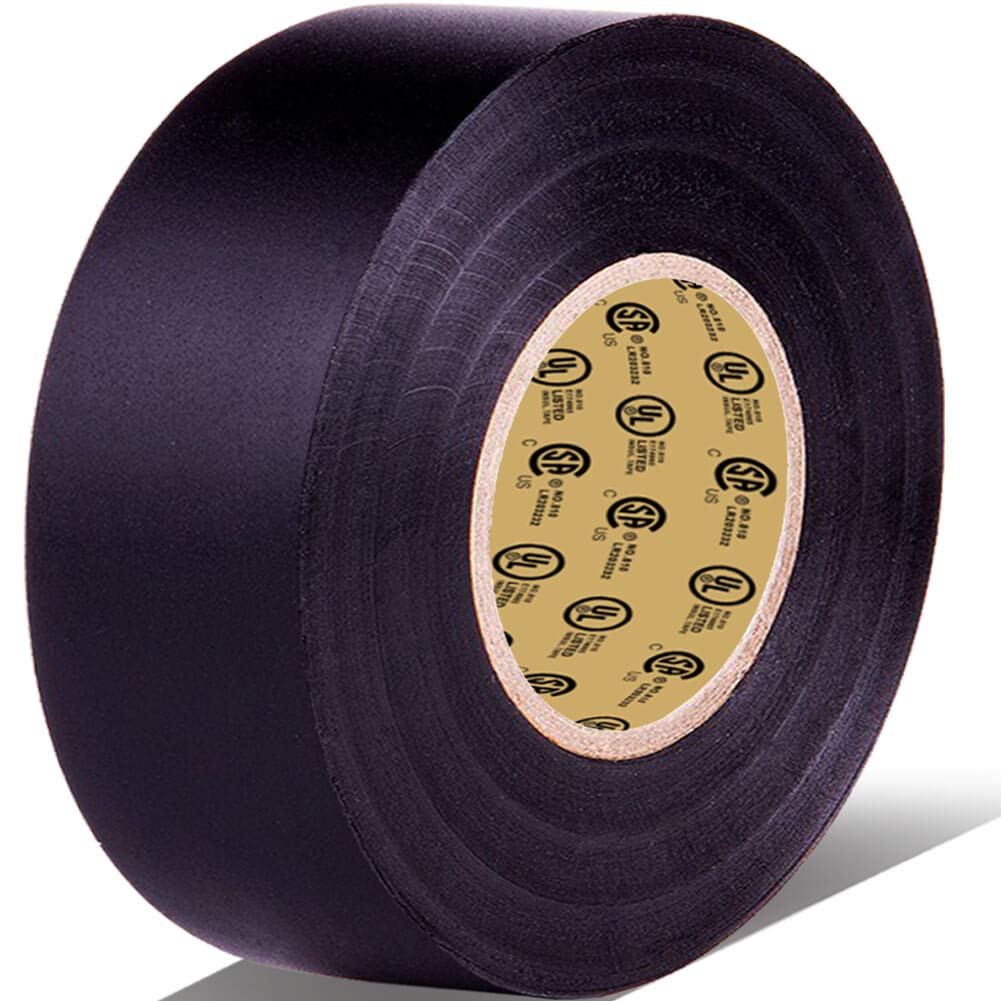
Material: PVC (Polyvinyl Chloride)
Size: 66 feet x 3/4 inch x 0.07 mil
Color: Black
Insulation tape is another house accessory that is widely known and used for electrical insulation repairs. Experienced electricians often use insulation tape instead of wire cups. It is easy to find and valuable to have in every toolbox.
Conclusion
It is vital to understand how baseboard heaters work and their main parts to easily handle removal instructions when starting this project. Familiarize yourself with installation properties and follow the steps in the given order. Order is important; we compiled instructions in a way that follows the exact process of baseboard heater removal.
Another critical step is to check that you have all the necessary tools before removing the heater. It is great to do things by yourself, but safety should come first. So, make sure to double-check every single step to protect yourself from injuries.
We recommend that you don’t do this alone, have someone with you who can help you if needed. Better to be safe than sorry.